Anyways, this is an idea that was inspired by some pins that I had seen...but I wanted to make it custom for myself. This was easy, but time consuming because I am a perfectionist, but the final product was definitely worth it.
***I looked into ordering these tiles (3"x3") and the cost (without shipping/handling/tax) was $97.50!!! So, with a little elbow grease I made these for somewhere between five and ten bucks!
We love playing games, and Scrabble is a classic word game that my wife and I used to play when we first got married. Almost every night we would make dinner, get caught up, and then play games for another hour or so after dinner just to hang out and stay connected. So for me, this project ties in our love for games, our family, and adds to the decor of our home. Here are the specs:
Time: a few hours over a couple of days (total 6-8 hrs)
Cost: $5-10 (if you have most of these things) closer to $20 (if you need to buy more materials)
Tools Needed:
a decent set of thin tipped paint brushes (got mine at Jo-Anns)
Dremel Tool (borrowed mine from my parents)
Saw to cut the tiles
Materials Needed:
1x4 premium pine (I got 27 tiles out of an 8 ft board)
Sandpaper
Stain (I had mine left over from previous projects)
Spray Poly-urethane (another left over from previous projects)
The Steps from Start to Finish
 |
| 1. I searched for a high-resolution photo of scrabble tiles, and then blew them up to be a 3.5" x 3.5" square. This will be my template for creating the jumbo tiles. |
 |
| 2. I took my 1x4x8 board of premium pine and cut them down to be square. Since a 1x4 is actually 3.5 inches wide, the square are 3.5 inches by 3.5 inches. |
 |
| 3. Then you square up up the template on the wood. You can see I was a little small on the template, but it is unnoticeable to the eye. |
 |
| 4. Then I took the pencil and carefully outlined the letter and the point value. When you remove the template you will see the outline indented on the surface of the wood. |
 |
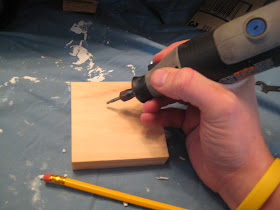
| 5. Now it's time for the Dremel tool. I first used the sanding tip to round off the corners and the edges of the tile. |
 |
| 7. This one was pretty shallow, but you can see the carved out letter, point value, and rounded edges. |
 |
| 8. I also smoothed the rough carving and the surface of the tile so that it would be nice and smooth as well as prepped for the painting and staining. |
 |
| 9. Now you are ready to start on making the finished product. |
 |
| 11. Now they are ready to be stained and topped with polyurethane. |
 |
| 12. I used a clear stain and polyurethane combo (Ployshades) and thought that only one coat was good enough. |


Looking good! I love the idea!
ReplyDelete